Table of Contents
Have you ever wanted to learn How to do a handstand? This impressive feat of strength and balance may seem intimidating at first, but with the right technique and practice, it's achievable for anyone. In this comprehensive guide, we'll break down the steps involved in doing a handstand, from warm-up to execution, and provide tips and variations to help you master this challenging pose. Whether you're a beginner or looking to improve your handstand skills, Kizworld has you covered.
How to Do a Handstand: A Step-by-Step Guide to Mastering the Inversion
I. Handstand Preparation: Laying the Foundation for Success
Handstand Preparation: Laying the Foundation for Success
Warm Up Properly
Before attempting a handstand, it's crucial to warm up your body to prevent injuries and improve your performance. Start with light cardio exercises like jogging or jumping jacks to elevate your heart rate and blood flow. Follow this with dynamic stretches that target the muscles used in a handstand, such as your shoulders, wrists, and core. Core strengthening exercises can also help stabilize your body during the handstand.
Pro Tip: Consider incorporating yoga or Pilates into your warm-up routine to enhance your flexibility and balance.
Choose the Right Spot
Select a safe and suitable location for your handstand practice. A sturdy wall or a gymnastics mat can provide support and cushioning if you lose your balance. Ensure the area is free of obstacles and has enough space for you to extend your legs fully.
Related: Choosing the Right Gymnastics Mat for Your Home Gym
Position Your Hands Correctly
The placement of your hands is crucial for maintaining balance and stability in a handstand. Position your hands shoulder-width apart, with your fingers spread wide and your palms flat on the floor. Your thumbs should be aligned with your index fingers, creating a solid base for your handstand.
Remember: Keep your hands directly under your shoulders to ensure proper weight distribution.
Kick Up with Control
To initiate the handstand, start with your feet shoulder-width apart and your toes pointed forward. Bend your knees slightly and swing your arms backward to generate momentum. As you swing your arms forward, simultaneously push off the ground with your feet and extend your legs upward. Keep your core engaged and your body straight as you kick up into the handstand position.
Related: Mastering the Basic Gymnastics Skills
Hold the Handstand with Stability
Once you're in the handstand position, focus on maintaining balance and stability. Keep your body straight, your core engaged, and your legs extended. Distribute your weight evenly between your hands and shoulders. Hold the handstand for as long as you can, gradually increasing the duration over time.
Quote: "The handstand is a test of strength, balance, and focus. It's a skill that requires dedication and practice to master." - Simone Biles
Come Down Safely
To come down from the handstand, slowly bend your elbows and lower your body towards the ground. Keep your core engaged and your legs extended as you descend. Once your feet touch the ground, step forward to regain your balance. Avoid collapsing or falling to prevent injuries.
Related: Common Gymnastics Injuries and Prevention
II. Tips for Beginners
- Start with a wall or a spotter for support.
- Focus on building strength and flexibility.
- Practice regularly to improve your balance and control.
- Don't be afraid to fall - it's part of the learning process.
- Stay patient and persistent - progress takes time.
III. Common Mistakes to Avoid
- Rushing into the handstand without proper warm-up.
- Incorrect hand placement, leading to instability.
- Kicking up with too much force, causing loss of control.
- Holding the handstand with a rounded back, increasing the risk of injury.
- Coming down too quickly, potentially resulting in a fall.
IV. Variations of the Handstand
- One-handed handstand: A challenging variation that requires exceptional balance and strength.
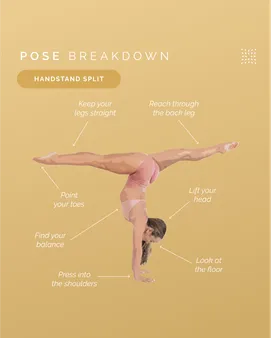
- Straddle handstand: A handstand with your legs spread apart, showcasing flexibility and control.
- Tuck handstand: A handstand with your knees tucked into your chest, demonstrating core strength and stability.
- Pike handstand: A handstand with your legs extended straight up, requiring immense strength and flexibility.
- Handstand push-ups: A dynamic variation that combines the handstand with push-ups, building upper body strength.
V. Handstand Workouts
Incorporate handstands into your workout routine to enhance your overall fitness and challenge your body. Here are some sample workouts:
Beginner Workout | Intermediate Workout | Advanced Workout |
|---|---|---|
3 sets of 10-15 second handstands | 3 sets of 20-30 second handstands | 3 sets of 45-60 second handstands |
3 sets of 5-10 handstand push-ups | 3 sets of 10-15 handstand push-ups | 3 sets of 20-25 handstand push-ups |
3 sets of 10-15 straddle handstands | 3 sets of 20-30 straddle handstands | 3 sets of 45-60 second straddle handstands |
VI. Safety Precautions
Always prioritize safety when practicing handstands. Consider the following precautions:
- Start with a spotter or near a wall for support.
- Warm up properly before attempting a handstand.
- Choose a safe and suitable location for your practice.
- Listen to your body and avoid pushing yourself too hard.
- If you experience pain or discomfort, stop immediately and consult a healthcare professional.
VII. Step-by-Step Guide to Perfecting the Handstand
Step-by-Step Guide to Perfecting the Handstand
Warm Up
Before attempting a handstand, it's essential to warm up your body to prevent injuries. Do some light cardio for 5-10 minutes to get your blood flowing. Follow this with dynamic stretches for your wrists, shoulders, and core muscles. Read more about the exercises here.
Tip: Practice near a wall or sturdy object for support until you feel comfortable balancing on your hands.
Find a Spot
Choose a clear and spacious area with a non-slip surface. You don't want to risk slipping and injuring yourself.
Tip: If you're practicing indoors, find a spot with high ceilings to avoid hitting your head.
Position Your Hands
Place your hands on the ground shoulder-width apart, fingers spread wide. Your hands should be slightly turned out, with your thumbs pointing forward.
Tip: Make sure your hands are directly under your shoulders, not too far forward or back.
Kick Up
Bend your knees and swing your legs up towards the ceiling. At the same time, push off the ground with your hands to generate momentum. Keep your core engaged and your body straight.
Tip: If you're having trouble getting your legs up, try doing a wall handstand instead. Check this to learn how to do it
Hold the Handstand
Once you're in a handstand, hold the position for as long as you can while maintaining good form. Keep your body straight, your core engaged, and your shoulders relaxed.
Tip: Don't hold your breath. Continue breathing normally throughout the hold.
Come Down
When you're ready to come down, bend your knees and slowly lower your legs back to the ground. Keep your core engaged and your body straight throughout the descent.
Tip: If you're feeling unstable, come down slowly and carefully to avoid injuring yourself.
Benefit | Explanation |
Improved Balance | Handstands challenge your balance and help you develop better control over your body. |
Increased Strength | Holding a handstand requires strength in your shoulders, arms, core, and legs. |
Enhanced Flexibility | Handstands stretch your hamstrings, calves, and shoulders, improving your overall flexibility. |
Boosted Confidence | Overcoming the fear of falling and mastering the handstand can give you a sense of accomplishment and boost your confidence. |
Decompressed Spine | Inverting your body in a handstand helps relieve pressure on your spine and improve posture. |
VIII. Tips for Beginners
Learn how to choose a yoga mat here. Opt for a yoga mat that's thick enough to provide cushioning and support during your practice.
Tip 2: Start slowly and gradually increase the duration of your handstand holds.
Tip 3: Don't be afraid to fall. Falling is a natural part of the learning process. Just get up and try again.
Tip 4: Practice regularly. The more you practice, the better you'll become at holding a handstand.
IX. Common Mistakes to Avoid
- Rushing the Kick Up: Don't rush the kick up. Take your time and generate momentum slowly.
- Not Engaging Your Core: Keep your core engaged throughout the handstand to maintain stability and prevent arching your back.
- Locking Your Knees: Keep your knees slightly bent to protect your joints and improve balance.
- Holding Your Breath: Remember to continue breathing normally during the handstand.
- Coming Down Too Quickly: Lower your legs slowly and controlled to avoid losing balance and falling.
Remember: Mastering the handstand takes time and practice. Be patient with yourself and keep practicing consistently. With dedication and perseverance, you'll eventually achieve your goal.
X. Mastering the Art of Balance: Tips and Techniques
Mastering the Art of Balance: Tips and Techniques
As you progress in your handstand journey, mastering balance becomes paramount. Here are some effective tips and techniques to help you achieve and maintain a stable handstand:
- Focus on Your Core: Engage your core muscles to stabilize your body and prevent swaying. A strong core provides a solid foundation for your handstand.
- Keep Your Legs Straight: Maintain straight legs throughout the hold. This helps distribute your weight evenly and reduces strain on your lower back.
Remember, practice is key. Start with shorter holds and gradually increase the duration as you gain confidence and control.
Mistake | Solution |
Kicking Up Too Quickly: | Control your momentum. Kick up slowly and steadily to avoid losing balance. |
Not Engaging the Core: | Activate your core muscles to stabilize your body and maintain proper alignment. |
Bending Your Legs: | Keep your legs straight to distribute weight evenly and reduce strain on your lower back. |
Whether you're a beginner or an experienced handstander, these tips and techniques will help you refine your balance and achieve a more stable and controlled handstand.
XI. Safety Considerations and Avoiding Common Handstand Mistakes
Safety Considerations and Avoiding Common Handstand Mistakes
Mistake: Rushing into the Handstand without Proper Warm-up
To avoid this mistake, be sure to warm up your body with dynamic stretches and exercises that focus on your wrists, shoulders, and core. This will help to prevent injuries and prepare your body for the demands of the handstand.
Visit our guide on Gymnastics Equipment for tips on choosing the best gear for your handstand practice.
Mistake: Attempting the Handstand without Sufficient Strength and Flexibility
Before attempting a handstand, it's important to have the necessary strength and flexibility in your wrists, shoulders, and core. Building up these qualities will help you to maintain control and stability while upside down.
Check out our article on Improving Flexibility with Gymnastics for exercises and stretches to enhance your flexibility.
Mistake: Incorrect Hand Placement
Improper hand placement can lead to instability and a lack of balance in your handstand. Your hands should be shoulder-width apart, with your fingers spread wide and pressing firmly into the mat.
If you're struggling with hand placement, refer to our resource on Gymnastics Mats to find the right mat for your practice.
Mistake: Kicking Up with Momentum Instead of Control
When transitioning into the handstand, it's important to kick up with control rather than relying on momentum. This will help you to maintain stability and avoid overshooting the vertical position.
For a detailed guide on handstand techniques, check out our article on Mastering Basic Gymnastics Skills.
Mistake: Holding the Handstand with Locked Elbows
Locking your elbows in the handstand can put excessive strain on your joints and increase the risk of injury. Instead, keep your elbows slightly bent and your core engaged to maintain a stable position.
For more tips on proper body alignment, visit our guide on Gymnastics Books and Podcasts.
Mistake: Coming Down from the Handstand Too Quickly
When dismounting from the handstand, it's important to lower yourself slowly and controlled to avoid putting stress on your joints and muscles. Bend your elbows and step down one leg at a time, maintaining balance throughout the process.
Discover the Best Gymnastics Movies and Documentaries for inspiring stories and insights into the world of gymnastics.